
Warm Maple Glazed Cinnamon Scone Bake
Baking can be one of the most comforting activities, especially when the result is something as delightful as Warm Maple Glazed Cinnamon Scone Bake. This recipe beautifully marries the sweet, rich flavor of maple syrup with the warm, spicy notes of cinnamon, creating an irresistible treat that’s perfect for breakfast, brunch, or an afternoon snack. The flaky texture of freshly baked scones, combined with a glossy maple glaze, not only satisfies the palate but also warms the heart, making it a favorite in many households.
The joy of baking scones at home lies in the process itself. The aroma that fills your kitchen as they bake is enough to bring anyone running to the table. With just the right balance of sweetness and a hint of spice, these scones are not just baked goods; they are a celebration of flavors that evoke the coziness of home. Whether you’re preparing for a special occasion or simply indulging in a quiet moment, this Warm Maple Glazed Cinnamon Scone Bake is sure to elevate your day.
Understanding the Ingredients
Before diving into the preparation, it’s essential to understand the role each ingredient plays in crafting the perfect scone. This recipe includes several key components that work together to create the desired flavor and texture.
1. All-Purpose Flour: As the foundation of the scone, all-purpose flour provides structure and texture. Its blend of protein and starch helps create a tender crumb while still maintaining enough strength to hold the scones together. For best results, consider using a kitchen scale to measure the flour accurately, as this can greatly affect the final outcome.
2. Granulated Sugar: Sugar does more than just add sweetness to the scones; it also contributes to browning and enhances the overall flavor. The caramelization that occurs during baking creates a beautiful golden crust, making the scones not only delicious but visually appealing as well.
3. Baking Powder: This leavening agent is crucial for achieving the light, fluffy texture characteristic of a well-made scone. Baking powder releases carbon dioxide when combined with moisture and heat, causing the dough to rise and become airy. Make sure your baking powder is fresh for optimal results.
4. Ground Cinnamon: As a key flavoring agent in this recipe, ground cinnamon adds warmth and a delightful aroma. Its spicy notes complement the sweetness of the maple glaze, creating a harmonious blend that tantalizes the taste buds.
5. Unsalted Butter: The choice of unsalted butter is important for controlling the saltiness of the scones. Butter not only adds rich flavor but also contributes to the flaky texture. When chilled and cut into the dry ingredients, it creates pockets of fat that expand during baking, leading to that signature scone flakiness.
6. Whole Milk and Egg: These ingredients provide moisture and richness to the dough. Whole milk enhances the flavor and contributes to a tender crumb, while the egg acts as a binding agent, helping to hold the ingredients together and adding a bit of richness to the overall flavor profile.
7. Maple Glaze Ingredients: The finishing touch to these scones is the maple glaze, which brings a luxurious sweetness that perfectly complements the warm cinnamon flavor. The glaze is made from powdered sugar and pure maple syrup, creating a sweet and glossy finish. A hint of vanilla extract in the glaze enhances the overall flavor, making it even more irresistible.
Step-by-Step Instructions for Making the Scones
Now that you understand the ingredients, let’s proceed with the initial steps for making the Warm Maple Glazed Cinnamon Scone Bake.
1. Preheat the Oven: Begin by preheating your oven to 400°F (200°C). This step is crucial as it ensures that the scones bake evenly and rise beautifully. An adequately heated oven creates the ideal environment for the baking powder to work its magic, resulting in light and fluffy scones.
2. Mixing the Dry Ingredients: In a large mixing bowl, combine the all-purpose flour, granulated sugar, baking powder, and ground cinnamon. Using a whisk, blend the dry ingredients thoroughly to achieve a uniform mixture. This step is essential as it ensures that the leavening agent is evenly distributed throughout the flour, preventing any uneven rising during baking.
As you mix, take a moment to appreciate the inviting aroma of the cinnamon. This is just a hint of the deliciousness to come.
3. Incorporate the Butter: Next, cut the chilled unsalted butter into small cubes and add it to the dry mixture. Using a pastry cutter or your fingertips, work the butter into the flour until the mixture resembles coarse crumbs. The goal is to create small pieces of butter that will melt during baking, producing a flaky texture. Be careful not to overwork the dough; you want to maintain those little bits of butter for the best results.
With these foundational steps, you’re well on your way to creating a batch of Warm Maple Glazed Cinnamon Scone Bake that will fill your home with warmth and comfort. The combination of ingredients and the method of preparation are essential to achieving the perfect scone, and each step builds on the last to ensure the final product is nothing short of delightful.
{{image_2}}
Cutting in the Butter: Techniques for Creating the Perfect Crumb Texture
Achieving the perfect crumb texture in your scones begins with the butter. The goal is to create small, pea-sized pieces of butter that remain intact throughout the mixing process. This technique is crucial for creating that delightful flaky texture that scones are known for.
1. Choose the Right Butter: Start with cold, unsalted butter, which is essential for maintaining the right temperature in your dough. If the butter is too warm, it will melt into the flour, resulting in a dense scone.
2. Cutting Methods: You can cut in the butter using three popular methods:
– Pastry Cutter: This is the traditional tool for cutting in butter. Simply hold the cutter in one hand and press down into the butter while rotating it through the flour.
– Fork: If you don’t have a pastry cutter, a fork works just as well. Use the tines to mash the butter into the flour until you achieve the desired consistency.
– Food Processor: For a quicker option, pulse the butter and flour together in a food processor until crumbly. Be careful not to over-process; you want the mixture to remain cool.
3. Texture Check: The mixture should look like coarse crumbs. If it resembles sand, you’ve overworked it. Aim for a balance between thoroughly mixed and still chunky.
Combining Wet Ingredients: Importance of Mixing for an Even Batter
After preparing the dry ingredients, it’s time to incorporate the wet ingredients. This step is vital for ensuring that the flavors are evenly distributed throughout the dough.
1. Mixing the Wet Ingredients: In a separate bowl, whisk together the eggs, heavy cream, and vanilla extract. Make sure the eggs are well-beaten, as this will help in creating a light and airy batter.
2. Incorporating into Dry Ingredients: Make a well in the center of your dry mixture and pour in the wet ingredients. Using a spatula or wooden spoon, gently fold the wet ingredients into the dry until just combined. Avoid overmixing, as this can lead to tough scones.
3. Visual Cues: The dough should be slightly sticky and shaggy, but not overly wet. If it feels too dry, add a splash of cream to help bring it together.
Forming and Shaping the Dough: How to Create the Ideal Scone Shape
Now that you have your dough ready, it’s time to shape it into scones. The way you handle the dough can significantly affect its final texture and appearance.
1. Flouring Your Surface: Lightly flour your work surface to prevent sticking. Turn the dough out onto the floured area and gently press it into a rectangle about 1-inch thick.
2. Cutting the Scones: Use a sharp knife or a bench scraper to cut the dough into triangles or squares. Make sure your cuts are clean and decisive to ensure even baking.
3. Spacing: Place the cut scones on a parchment-lined baking sheet, leaving some space between each piece. This allows for proper expansion during baking.
4. Chilling the Dough: For the best results, chill the shaped scones in the refrigerator for about 15-20 minutes before baking. This step helps the butter firm up again, resulting in a flakier texture.
Baking the Scones: Tips for Ensuring Optimal Doneness
The baking process is where your scones will transform into golden, fluffy delights. Follow these tips to ensure they come out perfectly every time.
1. Preheating the Oven: Always preheat your oven to the temperature specified in the recipe—usually around 400°F (200°C). A hot oven is critical for achieving the initial rise.
2. Baking Time: Scones typically bake for about 15-20 minutes. Keep a close eye on them during the last few minutes. They should be golden brown on top and firm to the touch.
3. Testing for Doneness: To check if the scones are done, insert a toothpick into the center of one. It should come out clean or with a few moist crumbs, but not wet batter.
4. Cooling: Once baked, allow the scones to cool slightly on the baking sheet for about 5 minutes before transferring them to a wire rack. This step helps maintain their structure and prevents sogginess.
Creating the Maple Glaze
While your scones are baking, it’s the perfect time to prepare the maple glaze, which adds a sweet finishing touch to your scones.
1. Instructions for Preparing the Glaze: In a small bowl, whisk together powdered sugar, pure maple syrup, and a splash of milk or cream. Start with a 1:1 ratio of maple syrup to powdered sugar and adjust as necessary.
2. Adjusting the Consistency: The glaze should be pourable but thick enough to coat the back of a spoon. If it’s too thin, add more powdered sugar; if it’s too thick, thin it out with a bit more liquid.
3. Flavor Enhancement Tips: For an extra flavor boost, consider adding a pinch of cinnamon or a splash of vanilla extract to your glaze. You can also experiment with other extracts, such as almond or orange, for unique variations.
Serving Suggestions
Presentation and pairing can elevate your Warm Maple Glazed Cinnamon Scone Bake experience.
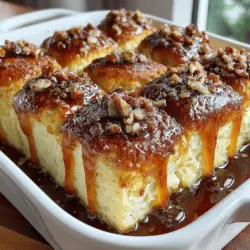
1. Presentation Ideas: Serve your scones warm on a beautiful platter. Drizzle the maple glaze over the scones just before serving for a visually appealing touch. Garnishing with a sprinkle of cinnamon or chopped pecans can add texture and style.
2. Pairing the Scones with Beverages: These scones pair wonderfully with a cup of freshly brewed coffee or a soothing herbal tea. For a cozy dessert option, serve with hot chocolate topped with whipped cream.
3. Optional Toppings and Additions: Enhance your scones further by sprinkling them with chopped nuts, such as walnuts or pecans, before baking. You can also add raisins or dried cranberries for a fruity twist.
Culinary Tips for Success
To ensure your baking experience is smooth and successful, keep these tips in mind:
1. Ingredient Temperature and Quality: Always use high-quality ingredients and ensure that your butter is cold. This will contribute to a better texture and flavor.
2. Common Mistakes to Avoid: Avoid overmixing the dough, as it can lead to dense scones. Additionally, be careful not to skip the chilling step, as this is crucial for maintaining the scone’s flakiness.
3. Variations on the Basic Scone Recipe: Feel free to get creative with your scone flavors. You can add spices like nutmeg or cardamom for warmth, or incorporate fresh fruits, chocolate chips, or citrus zests for a refreshing twist.
Conclusion
Making Warm Maple Glazed Cinnamon Scone Bake is not just about the delicious outcome; it’s an experience filled with warmth and comfort. The process of baking these scones—cutting in the butter, mixing the ingredients, and watching them rise and turn golden—brings a sense of joy and accomplishment.
Whether enjoyed as a delightful breakfast treat or served at an afternoon tea, these scones are bound to impress family and friends. We encourage you to try this recipe and savor the delightful flavors of cinnamon and maple with your loved ones. Enjoy the comfort and joy that comes from baking and sharing these wonderful scones!