
S’more Bliss: No-Bake Fudge Bars Recipe
Introduction
There’s something undeniably nostalgic about S’mores. The mere mention of this classic campfire treat evokes memories of summer nights spent around a crackling fire, the sweet aroma of toasted marshmallows mingling with the rich scent of melting chocolate. Whether you’re reminiscing about childhood camping trips or backyard bonfires, S’mores have a special place in the hearts of many. Their simple yet delightful combination of graham crackers, chocolate, and marshmallows creates a flavor profile that is both comforting and indulgent.
In recent years, the culinary world has seen a surge of creative interpretations of this beloved treat, and one standout recipe that has captured the attention of dessert lovers is the No-Bake Fudge Bars. This modern twist on the classic S’mores takes all the beloved flavors and transforms them into a decadent fudge-like bar, perfect for satisfying sweet cravings without the need for an oven. Not only do these bars retain the essence of traditional S’mores, but they also offer a delightful convenience.
What makes this recipe particularly appealing is its simplicity. Designed for bakers of all skill levels, it requires no special techniques or equipment—just a mixing bowl and a willingness to indulge in some deliciousness. Plus, the ingredients are easily accessible, ensuring that you can whip up a batch whenever the craving strikes.
Understanding the Ingredients
Before diving into the preparation of these delectable No-Bake Fudge Bars, let’s take a moment to understand the key ingredients that come together to create this unforgettable treat.
Graham Cracker Crumbs
At the heart of the S’mores experience are graham cracker crumbs, which serve as the foundation for our fudge bars. These sweet, crumbly bits provide the perfect texture and flavor, reminiscent of the classic S’mores crust. The slight caramel notes in graham crackers enhance the overall sweetness of the bars, making them irresistible.
Cocoa Powder
To achieve that rich chocolate flavor characteristic of any good fudge, cocoa powder is an essential ingredient in this recipe. It not only adds depth and richness but also enhances the overall chocolate experience, ensuring that every bite is bursting with cocoa goodness.
Peanut Butter
Peanut butter plays a crucial role in binding the ingredients together while contributing a creamy texture to the fudge bars. Its nutty flavor complements the sweetness of the marshmallows and chocolate, adding a delightful layer of complexity to the overall taste. Whether you opt for smooth or crunchy peanut butter, this ingredient is vital for achieving a satisfying consistency.
Maple Syrup (or Honey)
As a natural sweetener, maple syrup or honey enhances the flavor of the fudge bars while also providing moisture. The choice between the two can alter the flavor profile slightly—maple syrup brings a warm, earthy sweetness, while honey adds a floral touch. Either way, both options will create a sticky base that holds everything together beautifully.
Vanilla Extract
A splash of vanilla extract elevates the taste profile of the fudge bars, introducing a hint of warmth that rounds out the flavors. This subtle yet impactful ingredient is often overlooked, but it plays a vital role in creating a well-balanced dessert.
Mini Marshmallows
No discussion of S’mores is complete without mentioning marshmallows. In this recipe, mini marshmallows add both texture and sweetness, mimicking the gooey goodness that comes from traditional S’mores. Their presence in the fudge bars serves as a reminder of the beloved campfire treat, making each bite a nostalgic experience.
Chocolate Chips
To take the chocolate experience to the next level, chocolate chips are incorporated into the mix. These little bursts of chocolate provide an extra layer of indulgence, ensuring that every bite is rich and satisfying. You can choose to use semi-sweet, dark, or even milk chocolate chips based on your personal preference.
Crushed Graham Crackers and Extra Marshmallows for Topping
Finally, for presentation and texture, crushed graham crackers and additional marshmallows are used as a topping. This finishing touch not only enhances the visual appeal of the fudge bars but also adds a delightful crunch and chewiness that complements the creamy fudge base.
Step-by-Step Instructions
Now that you’re familiar with the key ingredients, let’s walk through the step-by-step instructions for preparing these No-Bake Fudge Bars.
Preparing the Base
Start by mixing the graham cracker crumbs and cocoa powder in a large mixing bowl. Combine them thoroughly to ensure a uniform blend—this is essential for achieving the perfect base. The cocoa powder will need to be evenly distributed throughout the crumbs, ensuring that every bite of the fudge bars is packed with chocolate flavor. Once blended, set this mixture aside for the next step.
Combining the Wet Ingredients
In a separate bowl, it’s time to combine the wet ingredients. Begin by adding the peanut butter, maple syrup (or honey), and vanilla extract. Using a spatula or wooden spoon, mix these ingredients together until you achieve a smooth, creamy consistency. If your peanut butter is particularly stiff, you may want to microwave it for a few seconds to soften it slightly, making it easier to mix. The goal here is to create a cohesive mixture that will bind with the dry ingredients seamlessly.
Bringing it All Together
Once your wet ingredients are mixed to perfection, it’s time to integrate them with the dry mixture. Pour the wet ingredients into the bowl containing the graham cracker and cocoa mixture. Using a spatula, gently fold the two mixtures together until fully combined. Be careful not to overmix, as you want to maintain a thick, fudgy texture. The final mixture should be dense and sticky, making it easy to press into a pan.
Adding the Marshmallows and Chocolate Chips
To complete the fudge mixture, gently fold in the mini marshmallows and chocolate chips. This step is crucial; you want to ensure that the marshmallows remain intact for that delightful chewy texture in each bar. Take your time with this step, folding the ingredients rather than stirring vigorously. The marshmallows should be evenly distributed throughout the fudge mixture, creating pockets of sweetness and chocolate that will make each bite an adventure.
With these initial steps completed, you’re well on your way to creating your own batch of S’more Bliss: No-Bake Fudge Bars. The next phase involves pressing this delicious mixture into a prepared pan and allowing it to set, but that will be covered in the subsequent sections. Stay tuned as we continue to explore this delightful recipe!
{{image_2}}
Transferring to the Baking Pan
Once you’ve mixed your fudge mixture to a perfectly smooth consistency, it’s time to transfer it to the baking pan. Properly lining the pan is crucial for easy removal of the fudge bars later. To do this, take an 8×8 inch or 9×9 inch square baking pan and line it with parchment paper, leaving some overhang on the sides. This overhang will act as handles when you pull the fudge out of the pan, making slicing much easier.
After lining the pan, pour the fudge mixture into it. Use a spatula to spread the mixture evenly across the bottom. To achieve a smooth surface, gently press the back of the spatula against the fudge and rotate the pan as needed. Ensuring an even layer not only enhances the visual appeal of your final product but also ensures that every bite is just as delicious as the last.
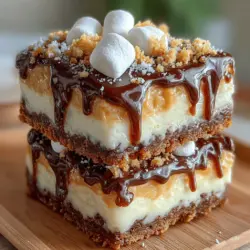
Topping the Fudge
The next step is to add the toppings, which are essential for that signature s’mores experience. Feel free to get creative with the toppings! Classic choices include mini marshmallows, graham cracker crumbs, and chocolate chips. For even distribution, sprinkle the toppings evenly across the surface of the fudge mixture. You might want to lightly press down on the toppings with your fingers or the back of a spoon to ensure they adhere to the fudge.
The impact of well-distributed toppings on the final look is significant. Not only do they provide a delightful crunch and visual contrast against the smooth fudge, but they also enhance the flavor profile, giving a nod to the traditional campfire s’mores. If you want to elevate the aesthetic, consider drizzling some melted chocolate over the top for added richness and a gourmet touch.
Chilling and Setting
Now that your fudge is topped, it’s time for the chilling process. Place the baking pan in the refrigerator and chill for at least 2 hours, or until the fudge is firm to the touch. This step is crucial for achieving the right fudge consistency; without proper chilling, your fudge bars may not hold their shape when sliced.
During the chilling process, the fats in the chocolate solidify, creating that luscious, fudgy texture we all crave. The longer you chill, the firmer the fudge will become, so if you prefer a denser bite, consider leaving it in the fridge for an additional hour.
Slicing and Serving
Once the fudge has set, it’s time to slice it into bars. Use the parchment paper overhang to lift the fudge out of the pan and onto a cutting board. With a sharp knife, cut the fudge into even squares or rectangles, depending on your desired size. For cleaner cuts, warm the knife under hot water and wipe it dry before slicing; this will help prevent the fudge from sticking to the blade.
When it comes to serving, presentation can elevate your no-bake fudge bars from simple treats to show-stopping desserts. Arrange the bars on a decorative platter and garnish with extra graham cracker crumbs or a few additional mini marshmallows for a fun touch. For a more casual approach, stack the bars in a mason jar, which also makes for a delightful gift.
Understanding the No-Bake Concept
One of the greatest advantages of no-bake recipes is their time-saving benefits and ease of preparation. This makes them ideal for those who lead busy lifestyles but still want to indulge in delicious homemade treats. With minimal cooking time and no need for an oven, you can whip up these S’more Bliss Fudge Bars in under 30 minutes, allowing you to spend more time enjoying the company of friends and family rather than slaving away in the kitchen.
Furthermore, no-bake recipes often require fewer dishes, making clean-up a breeze. You can enjoy the satisfaction of creating something special without the stress associated with traditional baking techniques. This recipe is particularly forgiving, allowing for adjustments and substitutions without sacrificing flavor or texture.
The Perfect Occasions for S’more Bliss Fudge Bars
These S’more Bliss Fudge Bars are versatile enough to shine at various occasions:
– Family Gatherings and Parties: Their nostalgic flavor makes them a hit at family reunions or birthday parties. Their ease of preparation means you can make them ahead of time, leaving you free to enjoy the festivities.
– Outdoor Barbecues and Camping Trips: Bring these bars along for a sweet treat after a day of outdoor fun. They don’t require refrigeration for short periods, making them perfect for picnics or camping trips.
– School Events and Bake Sales: With their appealing look and delicious taste, these fudge bars are sure to attract attention at bake sales. Plus, they are easy to package and sell!
– Movie Nights at Home: Create a cozy movie night experience with these rich, chocolatey bars. Serve them alongside popcorn and your favorite beverages for a delightful treat.
Nutritional Insights
When it comes to the nutritional profile of S’more Bliss Fudge Bars, they are a treat that balances indulgence with mindful eating. Each bar contains a combination of rich ingredients like chocolate, which provides antioxidants, and nuts or seeds if added, which contribute healthy fats and protein.
For those with dietary considerations, it’s easy to adapt this recipe. To make it vegan, simply use dairy-free chocolate and ensure that any additional ingredients like graham crackers are also vegan-friendly. This way, everyone can enjoy a taste of nostalgia without compromising their dietary preferences.
Conclusion
In summary, the S’more Bliss No-Bake Fudge Bars are a delightful fusion of nostalgia and modern convenience, encapsulating the classic flavors of s’mores without the need for a campfire. Their ease of preparation and adaptability make them perfect for a variety of occasions, from casual family gatherings to elegant celebrations.
By embracing the joy of making and sharing these delicious treats, you not only satisfy your sweet tooth but also create lasting memories with loved ones. So gather your ingredients, unleash your creativity, and indulge in the bliss of these no-bake fudge bars—your taste buds will thank you!