
Turkey Chili and Cheese Mini Sliders Recipe
Introduction
Turkey Chili and Cheese Mini Sliders are an irresistible combination of hearty flavors and delightful textures that make them a favorite for gatherings, parties, and family dinners alike. These bite-sized treats are not only crowd-pleasers but also versatile enough to cater to a variety of palates. Whether you’re serving them at a game day event or as a cozy weeknight meal, these sliders are sure to impress.
The beauty of Turkey Chili and Cheese Mini Sliders lies in their rich flavor profile, which is a harmonious blend of spices, savory turkey, and creamy cheese. This recipe showcases how simple ingredients can come together to create something truly special. From the comforting warmth of chili to the gooeyness of melted cheese, each bite offers a delightful experience that beckons for more.
Understanding the Ingredients
To appreciate the deliciousness of Turkey Chili and Cheese Mini Sliders, it’s essential to understand the key ingredients that contribute to this dish’s success.
Ground Turkey
Ground turkey serves as the foundation of this recipe, providing a lean protein source that is both nutritious and flavorful. Compared to traditional ground beef, ground turkey is lower in fat and calories, making it a healthier option without sacrificing taste. Its mild flavor allows it to absorb the spices and aromatics used in the chili, ensuring a satisfying bite every time. As a versatile ingredient, ground turkey can easily take on the role of the star of the dish, providing a base that is both hearty and wholesome.
Beans
Beans are another crucial component of the chili, adding both texture and nutritional value. Black beans or kidney beans are often used, each bringing their unique flavor and creamy texture to the dish. Rich in protein, fiber, and essential nutrients, beans contribute to the dish’s heartiness while keeping it filling and nutritious. Their inclusion not only enhances the overall flavor but also helps to create a well-rounded meal that is satisfying and wholesome.
Aromatics
Onion and garlic are the unsung heroes of many delicious dishes, including this Turkey Chili. These aromatics play a vital role in building the foundational flavors of the chili. Sautéing onions until they are soft and translucent releases their natural sweetness, which balances the spiciness of the chili. Garlic adds depth and a robust flavor that enhances the overall taste. Together, they create a savory base that makes every bite of the sliders irresistible.
Spices
The spices used in Turkey Chili are what truly elevate this dish. A blend of chili powder, cumin, and smoked paprika creates a depth of flavor that is both complex and satisfying. Chili powder adds heat and richness, while cumin introduces an earthy undertone that complements the other ingredients beautifully. Smoked paprika contributes a subtle smokiness that rounds out the flavors, making each slider incredibly flavorful. The careful balance of these spices is key to creating a chili that is both warming and inviting.
Slider Buns and Cheese
No slider is complete without a good bun and cheese. The slider buns should be soft yet sturdy enough to hold the chili without falling apart. They act as the perfect vessel for the flavorful turkey chili, soaking up the juices while providing a satisfying chew. For the cheese, a gooey, melty option like cheddar or Monterey Jack works wonders, adding a creamy richness that complements the spices and enhances the overall flavor. The combination of chili, cheese, and buns creates a delicious trifecta that is hard to resist.
Step-by-Step Guide to Making Turkey Chili
Now that we’ve covered the ingredients, let’s dive into the step-by-step process of making the turkey chili that will serve as the filling for our sliders.
Preparing the Base of the Chili
Start by gathering all your ingredients and setting up your cooking space. Having everything ready to go will make the cooking process smoother and more enjoyable. Begin by chopping your onions and garlic, as well as any other vegetables you plan to include, such as bell peppers. This prep work is essential for creating a flavorful base for your chili.
Sautéing Onions and Garlic
In a large pot or Dutch oven, heat a drizzle of olive oil over medium heat. Add the chopped onions first, allowing them to sauté until they are soft and translucent, which usually takes about 5 minutes. Next, add the minced garlic and cook for an additional minute, stirring frequently to prevent it from burning. The fragrant aroma that fills your kitchen at this stage is a sign that you are on the right track to creating a delicious chili base.
Cooking the Turkey
Once the onions and garlic are beautifully sautéed, it’s time to add the ground turkey to the pot. Use a spatula to break up the turkey as it cooks, ensuring that it browns evenly. Cooking the turkey until it is no longer pink not only ensures safety but also enhances the flavor as it absorbs the aromatics. Aim for a crumbly texture that will blend well with the rest of the ingredients. This step is crucial, as the quality of the turkey will significantly affect the overall taste of your chili.
Layering in the Vegetables and Beans
After the turkey is cooked through, it’s time to layer in your vegetables and beans. If you’re adding bell peppers, dice them into small pieces and add them to the pot at this stage. They should soften and integrate into the mixture, adding both flavor and texture. Following the bell peppers, incorporate the beans, stirring them into the chili. This not only adds heartiness but also enhances the nutritional profile of the dish.
Importance of Cooking Bell Peppers
Cooking bell peppers is essential for achieving the right texture in your chili. When cooked, they become tender and sweet, contributing to the overall harmony of flavors. Avoid adding them too late in the cooking process, as this can lead to a crunchy texture that may not blend well with the rest of the chili. Allow them to simmer with the turkey and beans, letting their flavors meld and develop.
Incorporating Canned Tomatoes and Beans
Next, it’s time to add canned tomatoes to the mix. Use diced tomatoes with their juices, which not only add flavor but also help to create a saucy consistency for the chili. Stir the tomatoes into the mixture, allowing them to combine with the turkey and beans. The acidity of the tomatoes balances the richness of the meat and beans, creating a well-rounded flavor profile.
Seasoning the Chili
Now comes the fun part – seasoning the chili! Sprinkle in your chosen spices, including chili powder, cumin, and smoked paprika. Adjust the quantities to suit your taste preferences, but be sure to start with a moderate amount and taste as you go. You can also add a splash of broth or water to reach your desired consistency. The key here is to balance the flavors, ensuring that the heat from the spices, the sweetness from the onions, and the acidity from the tomatoes all come together harmoniously.
The Simmering Process
Once everything is combined, lower the heat and let the chili simmer. This is where the magic happens, as the flavors meld and deepen over time. Allow the chili to simmer for at least 20-30 minutes, stirring occasionally. This simmering process is vital for developing the rich, complex flavors that make this dish so satisfying. If time allows, letting it simmer longer will yield even better results, as the ingredients will continue to meld together beautifully.
Crafting the Sliders
While the chili is simmering and the flavors are developing, it’s time to prep the slider buns. Choose a soft yet sturdy slider bun that can hold the filling without falling apart. You may want to lightly toast the buns in the oven or on a skillet to add a bit of crunch, which can enhance the overall texture of the sliders.
By carefully preparing each component, from the chili to the buns, you set the stage for creating Turkey Chili and Cheese Mini Sliders that are sure to be a hit at any gathering. Stay tuned for the next part of the article, where we will assemble these delicious sliders and explore serving suggestions that will elevate your dining experience.
{{image_2}}
Choosing the Right Type of Buns: Options and Alternatives
When it comes to making Turkey Chili and Cheese Mini Sliders, the type of bun you choose plays a pivotal role in the overall experience of the dish. Here are some excellent options and alternatives that can enhance your sliders:
– Slider Buns: Traditional mini burger buns are the go-to choice for sliders. They are soft, pillowy, and perfectly sized for a single serving of chili and cheese.
– Hawaiian Rolls: These sweet, fluffy rolls add a delightful contrast to the savory chili and cheese filling. Their slight sweetness pairs well with the spiciness of the chili.
– Whole Wheat Buns: For a healthier option, consider whole wheat buns. They provide added fiber and nutrients while maintaining a similar texture to traditional buns.
– Cornbread Muffins: For a unique twist, use halved cornbread muffins. They offer a slightly sweet flavor profile and a crumbly texture that complements the chili.
– Lettuce Wraps: For a low-carb alternative, use large lettuce leaves to wrap the chili and cheese filling. This option is refreshing and adds a crunch.
How to Slice and Prepare Buns for Optimal Filling
To ensure that your sliders are easy to assemble and enjoy, it’s essential to slice and prepare your buns correctly:
1. Slice the Buns: If you’re using slider or Hawaiian rolls, slice them in half horizontally. Make sure to keep the top and bottom halves together, as this will help with assembly.
2. Optional Toasting: For added flavor and texture, consider lightly toasting the inside of the buns. Simply place them cut-side down on a hot skillet for a minute or two until golden brown.
3. Prep for Filling: If you’re using a denser bun, such as a cornbread muffin, gently scoop out a bit of the center to create more space for the chili and cheese filling. This prevents overflow and makes for easier handling.
Assembling the Sliders
Once your buns are prepared, it’s time to assemble the sliders. Here’s a step-by-step guide:
1. Bottom Bun Layer: Place the bottom half of each bun on a serving platter or baking sheet.
2. Add Chili: Spoon a generous amount of the prepared turkey chili onto each bottom bun. Be sure to fill them but avoid overfilling to prevent messiness.
3. Cheese Layer: Sprinkle shredded cheese over the chili. This could be cheddar, Monterey Jack, or a blend. The cheese acts as a binding agent, helping to hold everything together.
4. Top Bun: Place the top half of each bun gently on top of the cheese. Press down lightly to ensure everything is compact but still fluffy.
Techniques for Even Distribution of Chili and Cheese
To ensure that each slider has a balanced flavor and texture, consider these techniques:
– Use a Portion Scoop: A portion scoop or ice cream scoop can help you serve an even amount of chili onto each bun. This ensures consistent flavor in every bite.
– Layering: If you’re making multiple sliders, alternate the chili and cheese layers between batches. This helps maintain even distribution across all sliders.
– Spread the Cheese: Instead of just sprinkling cheese on top, consider spreading a thin layer of cheese on the bottom bun before adding the chili. This creates a cheesy barrier that helps keep the buns from getting soggy.
Tips for Stacking Ingredients to Prevent Sogginess
Sogginess can be a concern when stacking ingredients in sliders. Here are some tips to avoid this issue:
– Chili Consistency: Ensure that your chili isn’t too watery. If it seems loose, let it simmer longer to thicken. A thicker chili holds up better in sliders.
– Avoid Overloading: While it can be tempting to pile on the chili and cheese, moderation is key. Overloading the sliders can lead to an unmanageable and soggy outcome.
– Layer Wisely: Consider using fresh ingredients like lettuce or sliced tomatoes as a barrier between the chili and the bun. This can help absorb some moisture and keep the bun intact.
Baking the Sliders to Perfection
Preparing the Oven for Baking: The Right Temperature and Timing
Once your sliders are assembled, it’s time to bake them:
1. Preheat the Oven: Set your oven to 350°F (175°C). This temperature allows the sliders to heat through without burning the buns.
2. Baking Time: Bake the sliders for about 15-20 minutes or until the cheese is melted and bubbly. Keep an eye on them to prevent overcooking.
Importance of Covering with Foil: Achieving the Right Melt and Warmth
Covering your sliders with foil during the first part of baking can make a significant difference:
– Retaining Moisture: Foil helps trap steam, ensuring that the buns don’t dry out while the cheese melts perfectly.
– Even Heating: Covering the sliders ensures an even distribution of heat, allowing the cheese to melt throughout the dish rather than just on top.
Tips for Achieving a Crispy Top Without Over-Baking
To achieve a crispy top without risking over-baking, follow these tips:
– Remove the Foil: About 5 minutes before the sliders are done, remove the foil to allow the tops to crisp up.
– Broil for Finish: For an extra crispy top, you can switch your oven to broil for the last 1-2 minutes. Just keep a close watch to prevent burning.
Serving Suggestions and Variations
Ideas for Garnishing Sliders
Garnishing your sliders can enhance their presentation and flavor. Consider these ideas:
– Fresh Herbs: Sprinkle chopped cilantro or parsley on top for a burst of color and freshness.
– Pickled Onions: Add a tangy touch with pickled red onions. They provide a nice contrast to the rich flavors of the chili and cheese.
– Sour Cream or Greek Yogurt: A dollop of sour cream or Greek yogurt on top can add creaminess and a cooling effect against the chili’s spice.
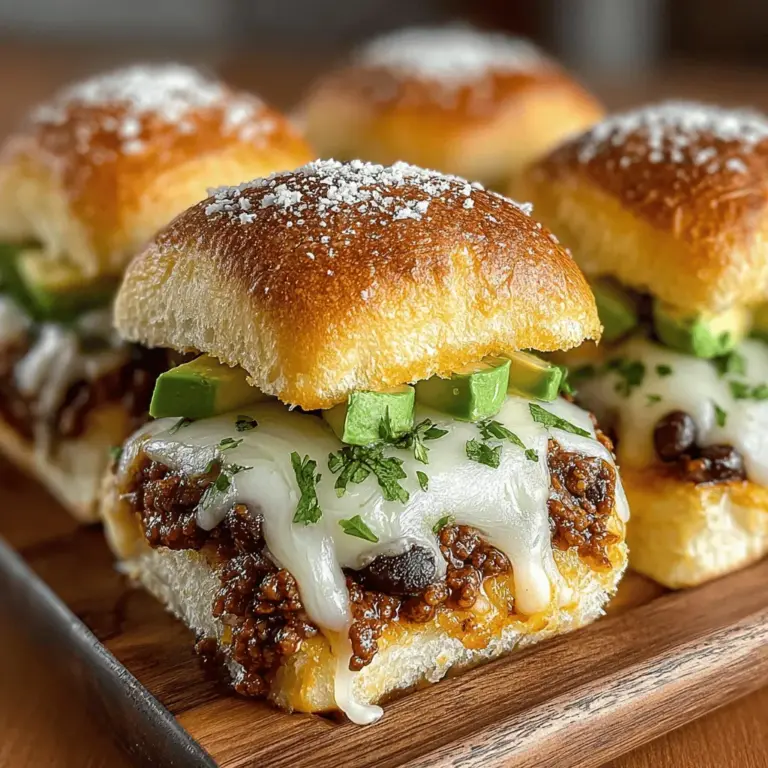
The Role of Avocado and Cilantro in Enhancing Flavor and Presentation
Avocado and cilantro are excellent additions that can elevate your sliders:
– Avocado Slices: Creamy avocado slices can enhance the flavor profile, providing a rich contrast to the spicy chili.
– Cilantro: Fresh cilantro not only adds flavor but also brightens the dish visually. It’s an excellent herb choice to complement the chili’s spices.
Exploring Variations of the Recipe
One of the best aspects of Turkey Chili and Cheese Mini Sliders is their versatility. Here are some variations you can try:
– Alternative Proteins: Swap out turkey for ground chicken, beef, or even plant-based alternatives like lentils or black beans for a vegetarian option.
– Different Cheese Choices: Experiment with various cheeses like pepper jack for a kick, blue cheese for a bold flavor, or mozzarella for a milder taste.
– Toppings Customization: Consider adding jalapeños, diced tomatoes, or even jalapeño popper dip as toppings for extra flavor and texture.
Nutritional Information and Health Benefits
Breakdown of Calories and Macronutrients Per Slider
Understanding the nutritional value of your sliders can help you enjoy them guilt-free. On average, one Turkey Chili and Cheese Mini Slider contains:
– Calories: Approximately 200-250 calories
– Protein: 15-20 grams
– Fat: 8-12 grams
– Carbohydrates: 20-25 grams
Discussing the Health Benefits of Using Lean Turkey and Beans
Using lean turkey in your chili not only keeps the dish flavorful but also offers several health benefits:
– Lean Protein: Turkey is a great source of lean protein, which helps in muscle repair and growth while keeping calorie counts lower.
– Nutrient-Rich Beans: Incorporating beans into your chili adds fiber, which aids in digestion and keeps you feeling full longer. Beans are also rich in vitamins and minerals.
How Sliders Can Fit into a Balanced Diet
Turkey Chili and Cheese Mini Sliders can be a part of a balanced diet when consumed in moderation. Pair them with a side of fresh salad or steamed vegetables to increase your nutrient intake. The flexibility of the recipe allows for portion control and ingredient substitutions to meet your dietary needs.
Conclusion
Turkey Chili and Cheese Mini Sliders are the perfect meal option for gatherings, game days, or a cozy family dinner. Their combination of savory turkey chili, gooey cheese, and soft buns creates a mouthwatering experience that is hard to resist. With simple preparation steps and endless possibilities for customization, this recipe allows you to impress your guests while keeping your cooking experience enjoyable.
We encourage you to try this recipe for its simplicity and rich flavors. Whether you keep it classic or explore the many variations available, these sliders are sure to delight everyone around the table. Enjoy the versatility of this dish, adapting it for various occasions or dietary preferences, and savor every bite of your delicious creation.