
Crunchy Delight: Crispy Falafel Pita Pockets
In the realm of healthy eating, few dishes are as satisfying as crispy falafel pita pockets. These delightful pockets are not only packed with plant-based protein but also offer a wonderful blend of flavors and textures that make them a favorite among both vegetarians and meat-lovers alike. The combination of crunchy falafel, fresh vegetables, and creamy sauces enveloped in warm pita bread creates a meal that is both wholesome and delicious.
Falafel has become a staple in modern cuisine, celebrated for its versatility and rich flavor profile. This article will take you through a detailed recipe for creating delicious crispy falafel, as well as assembling the perfect pita pockets to enjoy them in. Whether you’re looking for a quick lunch option or a fun dinner to impress guests, these falafel pita pockets are sure to delight.
Understanding Falafel: A Middle Eastern Classic
To truly appreciate the crispy falafel in our pita pockets, it’s essential to delve into the origins and significance of this beloved dish. Falafel is thought to have originated in the Middle East, with various countries claiming its invention. Some food historians trace falafel back to ancient Egypt, where fava beans were used to create the first iterations of this dish. Over time, it spread throughout the Levant region, becoming a staple in countries like Lebanon, Israel, and Palestine.
The cultural significance of falafel cannot be overstated. It has become a symbol of Middle Eastern cuisine, often served at street food stalls and in restaurants worldwide. The dish is not only a culinary delight but also a representation of cultural identity, bringing people together to share in the joy of good food. Its rise in popularity in Western countries can be attributed to the growing interest in plant-based diets, as well as a broader appreciation for international flavors.
From a nutritional perspective, falafel is an excellent choice for those seeking healthier meal options. Made primarily from chickpeas, falafel is rich in plant-based protein, fiber, and essential vitamins and minerals. The high fiber content helps maintain digestive health, while the protein aids in muscle repair and growth. Additionally, falafel is generally low in saturated fat, making it a heart-healthy choice compared to many meat-based dishes.
Ingredients Breakdown
To create the perfect crispy falafel and assemble our pita pockets, we need to break down the essential ingredients.
Dried Chickpeas: The Heart of the Falafel
The foundation of any great falafel is the chickpea. While canned chickpeas can be used in a pinch, dried chickpeas are recommended for the best texture and flavor. Soaking and grinding dried chickpeas allows for a more robust falafel mix, ensuring that the final product is crispy on the outside and tender on the inside. This soak also enhances the nutritional value, allowing the chickpeas to rehydrate and maintain their natural nutrients.
Fresh Herbs: Parsley and Cilantro for Flavor
Fresh herbs play a crucial role in elevating the flavor of falafel. A combination of parsley and cilantro adds brightness and freshness, cutting through the richness of the fried chickpea mixture. Herbs not only contribute to the taste but also provide additional health benefits, including antioxidants and anti-inflammatory properties.
Spices: The Role of Cumin, Coriander, and Cayenne
The unique flavor profile of falafel comes from a carefully balanced mix of spices. Cumin and coriander are the star players, imparting warmth and earthiness that complement the chickpeas beautifully. Cayenne pepper adds a touch of heat, making each bite exciting. This blend of spices is what transforms a simple chickpea mixture into a savory delight.
Flour and Baking Powder: Achieving the Right Texture
To bind the falafel mixture and help it maintain its shape during frying, a small amount of flour is required. This ingredient also contributes to the crunchiness of the falafel. Baking powder is often added to give the falafel an airy texture, ensuring that they are light and crispy rather than dense.
Overview of the Ingredients Needed for Pita Pockets
While the falafel is the star of the dish, the pita pockets themselves play an essential supporting role.
– Whole Wheat Pita Breads: Whole wheat pita breads are a healthier alternative to traditional white pita. They are higher in fiber, which aids in digestion and keeps you feeling full longer. The nutty flavor of whole wheat also complements the savory falafel beautifully.
– Fresh Vegetables: Crisp lettuce, ripe tomatoes, cucumbers, and pickled red onions are excellent choices for stuffing into your pita pockets. These fresh vegetables not only enhance the flavor and texture of the dish but also add a nutritional boost, providing vitamins and minerals that round out the meal.
– Tahini Sauce: No falafel pita is complete without a drizzle of tahini sauce. This creamy dressing made from ground sesame seeds adds richness and a nutty flavor that harmonizes with the spices in the falafel. It can be easily customized with garlic, lemon juice, and a touch of water to achieve the desired consistency.
Step-by-Step Guide to Making Crispy Falafel
Now that we’ve explored the origins, cultural significance, and nutritional benefits of falafel, as well as the key ingredients, let’s dive into the preparation process. Making crispy falafel is straightforward but involves a few crucial steps to ensure the best results.
Preparation of the Falafel Mix
1. Soak the Chickpeas: Start by soaking dried chickpeas in water overnight. This will allow them to rehydrate and soften, making them easier to blend into a smooth mixture.
2. Drain and Rinse: After soaking, drain the chickpeas and rinse them well under cold water. This step is essential to remove any excess sodium and ensure the chickpeas maintain their natural flavor.
3. Blend the Ingredients: In a food processor, combine the soaked chickpeas, fresh herbs, spices, and a small amount of flour. Pulse the mixture until it reaches a coarse consistency. Be careful not to over-process; you want some texture to remain in the falafel.
4. Add Baking Powder: Once the mixture is well-blended, add baking powder and mix until fully incorporated. This will give your falafel the lightness needed for that perfect crunch.
5. Chill the Mixture: To help the falafel hold their shape during frying, refrigerate the mixture for at least 30 minutes. Chilling will help firm up the mixture, making it easier to form into balls or patties.
This initial preparation phase sets the stage for the creation of crispy falafel that will take your pita pockets to the next level. Stay tuned for the next steps in crafting the ideal falafel pita pockets!
{{image_2}}
Soaking Chickpeas: Importance of Overnight Soaking
The first step to creating the perfect falafel is soaking the chickpeas. This step is essential because it softens the chickpeas, allowing them to be blended into a smooth, cohesive mixture. Soaking overnight also reduces the cooking time and enhances digestibility. Dried chickpeas should be placed in a bowl and covered with plenty of water, as they will expand significantly. Aim for a minimum of 8 hours of soaking time. If time is short, a quick soak method can be employed, where chickpeas are boiled for 5 minutes and then allowed to sit for an hour before draining.
Blending Ingredients: Achieving the Right Consistency
Once the chickpeas are soaked and drained, it’s time to blend them with the other ingredients. This step is crucial for achieving the right texture in your falafel. In a food processor, combine the soaked chickpeas, garlic cloves, onion, fresh herbs (parsley and cilantro), ground cumin, coriander, baking powder, and salt. Pulse the mixture until it reaches a coarse paste, making sure not to over-blend, as you want some texture in the final product.
The consistency should be similar to that of a thick paste that holds its shape when formed into balls. If the mixture feels too dry, you can add a tablespoon of water at a time until it is manageable. Conversely, if it’s too wet, you can add a small amount of flour or breadcrumbs to help bind it together.
Shaping and Frying the Falafel
Shaping falafel can be a fun and rewarding experience. Use a spoon or a falafel scoop to form small balls or patties from the mixture. Wet your hands with water to prevent sticking, making it easier to shape the falafel without the mixture clinging to your fingers. Aim for golf ball-sized portions for the right size that will cook evenly and fit perfectly into your pita.
Tips for Shaping with Wet Hands
1. Keep hands wet: Regularly moisten your hands to avoid the mixture sticking.
2. Firm pressure: Gently but firmly compress the mixture into shape; this helps maintain the integrity of the falafel during frying.
3. Uniform size: Try to keep the sizes consistent for even cooking.
Frying Technique: Getting the Perfect Golden Color
Frying is where the magic happens, transforming your falafel mixture into crispy, golden delights. Heat oil in a deep pan or fryer to about 350°F (175°C). Use enough oil so that the falafel can float while frying, ensuring even cooking and a crispy exterior.
Carefully drop the falafel balls into the hot oil, being cautious not to overcrowd the pan to maintain the oil temperature. Fry for about 3-4 minutes on each side or until they reach a deep golden brown color. Once cooked, remove them with a slotted spoon and place them on a paper towel-lined plate to drain excess oil. This frying technique creates a crunchy exterior while keeping the inside moist and flavorful.
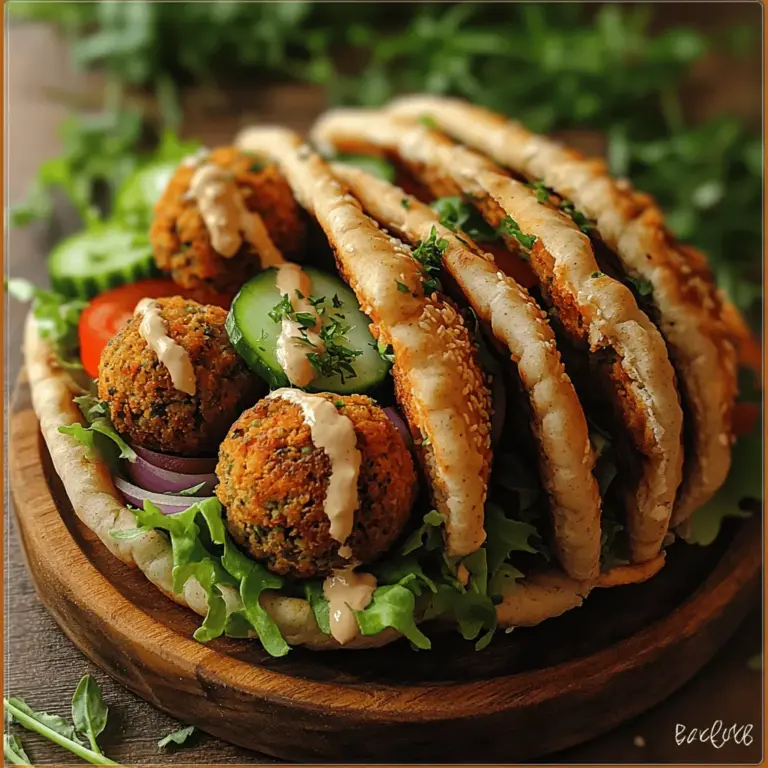
Crafting the Perfect Pita Pockets
Warming the Pita Breads
To enjoy your crispy falafel, you’ll need warm pita bread. This not only enhances the flavor but also makes the bread more pliable, allowing for easier assembly. There are several effective methods to warm pita:
1. Oven: Preheat your oven to 350°F (175°C). Wrap the pita in aluminum foil and place it in the oven for about 10 minutes.
2. Stovetop: Heat a skillet over medium heat and warm each pita for about 30 seconds on each side until soft.
3. Microwave: Place a damp paper towel around the pita and microwave for about 15-20 seconds.
Ensuring Easy Assembly
Warmed pita makes it easier to fill and enjoy your falafel pockets without tearing. Once the pitas are ready, set them aside while you prepare your fillings.
Assembling Your Falafel Pita Pockets
Layering Ingredients for Optimal Flavor
When it comes to assembling your falafel pita pockets, the order of ingredients can make a significant difference in taste and presentation. Here’s a suggested layering method that maximizes flavor:
1. Spread: Start with a layer of tahini sauce or hummus on the inside of the pita. This not only adds creaminess but also helps to hold the other ingredients in place.
2. Falafel: Add 2-3 crispy falafel balls into the pita.
3. Fresh Vegetables: Layer in chopped lettuce, diced tomatoes, cucumber, and shredded carrots for crunch and freshness.
4. Herbs and Spices: Finish with a sprinkle of fresh herbs like mint or parsley and a drizzle of your favorite dressing or sauce.
Suggestions for Variations
Feel free to customize your falafel pita pockets with various ingredients to suit your taste. Here are some ideas for delicious variations:
– Avocado: Add slices of creamy avocado for a rich texture and flavor.
– Pickled Vegetables: Incorporate pickled radishes or turnips for a tangy crunch.
– Spicy Sauce: Include harissa or sriracha for an extra kick.
– Cheese: Feta or goat cheese can add a creamy, salty element to your pockets.
Serving Suggestions and Presentation
Creative Ways to Serve Falafel Pita Pockets
Presentation can elevate your meal, making it more appealing to the eyes and palate. Here are a few creative serving suggestions:
– Arrange the pita pockets on a large platter, garnished with fresh herbs and lemon wedges for a pop of color.
– Serve with a side of tabbouleh or a refreshing cucumber salad to complement the flavors of the falafel.
– Offer a selection of dips, such as tzatziki, baba ganoush, or additional tahini sauce, alongside for dipping.
Plating Ideas for a Vibrant Presentation
1. Color Contrast: Use colorful vegetables and garnishes to create a visually striking plate.
2. Height: Stack the pita pockets slightly, adding height to your presentation.
3. Garnishes: Sprinkle sesame seeds, fresh herbs, or chili flakes on top for added flair.
Pairing with Side Dishes or Drinks
Enhance your meal by pairing your falafel pita pockets with complementary side dishes and beverages. Consider serving:
– Side Dishes: Crispy roasted potatoes, a light salad, or a side of Mediterranean rice.
– Drinks: A chilled glass of mint lemonade or a light herbal tea can refresh your palate and balance the flavors.
Conclusion
Crispy falafel pita pockets are not just a meal; they represent a celebration of flavors and cultures. With their crunchy exterior and flavorful interior, these pockets are a fantastic option for any occasion, whether it’s a casual family dinner or a gathering with friends. By following this detailed recipe, you can create a delicious and satisfying dish that highlights the wholesome ingredients and rich traditions of Middle Eastern cuisine. Enjoy the process and the delightful results of your culinary adventure!
