
In the sweltering heat of summer, nothing beats the joy of indulging in a cool treat. Homemade popsicles have surged in popularity in recent years, offering a delicious and healthier alternative to store-bought frozen desserts. What makes these homemade versions so appealing is not just their taste, but the freedom to experiment with flavors and ingredients. Among the myriad of creative options available, Tropical Bliss Pops stand out as a vibrant and refreshing choice. Bursting with tropical flavors, these pops are not only delicious but also packed with nutrition.
The Appeal of Tropical Bliss Pops
Imagine savoring the taste of ripe pineapple and creamy bananas, all while knowing you’re enjoying a wholesome snack. Tropical Bliss Pops are the perfect embodiment of summer, transporting you to a sunny beach with each bite. The combination of fresh ingredients creates a naturally sweet treat that is both satisfying and guilt-free. Additionally, these pops are easily customizable, allowing you to tweak the recipe to suit your personal preferences or dietary needs. Whether you want to go dairy-free, reduce sugar, or add an extra boost of nutrition, the possibilities are endless.
Understanding the Ingredients
Let’s take a closer look at the star ingredients that make Tropical Bliss Pops not only flavorful but also nutritious.
Fresh Pineapple
Pineapple is a tropical fruit that not only brings a vibrant sweetness but also a refreshing tanginess to your popsicles. Rich in vitamins C and B6, manganese, and dietary fiber, fresh pineapple is an excellent choice for boosting your immune system and aiding digestion. Its juicy texture adds an appealing quality to the pops, delivering a burst of flavor with every lick. When selecting a pineapple, look for one that is firm, with a sweet aroma, and slightly golden at the base for optimal ripeness.
Ripe Bananas
Bananas bring natural sweetness and a creamy texture to the mix. They are not only delicious but also packed with potassium, vitamin C, and vitamin B6, making them an excellent addition to your Tropical Bliss Pops. The creaminess of ripe bananas helps to create a smooth consistency when blended, ensuring your popsicles are easy to eat and enjoyable. For the best results, choose bananas that are speckled with brown spots, as they will be sweeter and easier to blend.
Coconut Yogurt
For those looking for a dairy-free option, coconut yogurt is the perfect substitute. Made from fermented coconut milk, it provides a creamy texture similar to traditional yogurt while adding a subtle coconut flavor. Coconut yogurt is rich in probiotics, which are beneficial for gut health, and it is also lower in sugar than many dairy yogurts. When selecting coconut yogurt, opt for unsweetened varieties to keep your pops healthy and let the natural sweetness of the fruits shine through.
Honey or Maple Syrup
To sweeten your pops, you can choose between honey and maple syrup. Honey is a natural sweetener that adds a delightful floral note, while maple syrup brings a rich, caramel-like flavor. Both options contain antioxidants and can provide a touch of sweetness without the drawbacks of refined sugar. If you’re vegan or avoiding honey, maple syrup is the perfect alternative. Adjust the amount of sweetener based on your taste preference and the ripeness of your fruit.
Vanilla Extract
A splash of vanilla extract elevates the flavors in your Tropical Bliss Pops, enhancing the overall taste experience. This aromatic ingredient pairs beautifully with the fruits, providing a warm undertone that balances the sweetness. Opt for pure vanilla extract for the best flavor, as imitation vanilla can lack the depth and complexity.
Sea Salt
While it may seem counterintuitive, a pinch of sea salt can enhance the sweetness of your pops and create a well-rounded flavor profile. Salt amplifies the natural flavors of the ingredients, ensuring that the pops are not overly sweet. The key is to use it sparingly, just enough to provide balance without being detectably salty.
Optional Toppings
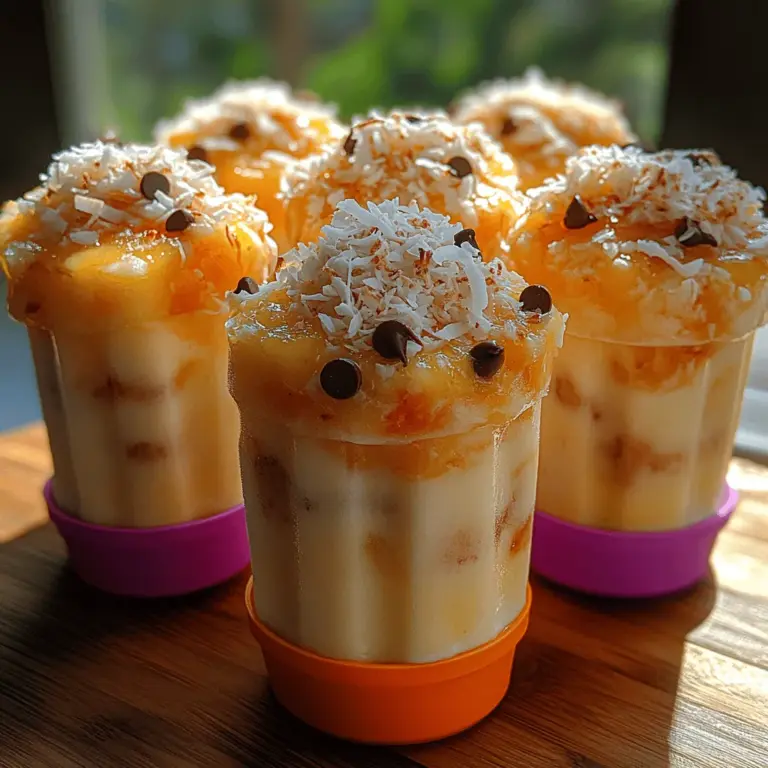
To add a fun twist and extra texture to your Tropical Bliss Pops, consider using optional toppings. Shredded coconut, chopped nuts, or small pieces of fresh fruit can be incorporated into the mixture or sprinkled on top of the pops before freezing. These toppings not only enhance the visual appeal but also provide additional crunch and flavor, making each bite a delightful experience.
Step-by-Step Guide to Making Tropical Bliss Pops
Now that you have a clear understanding of the ingredients, let’s dive into the step-by-step process of creating these delectable Tropical Bliss Pops. Each step is designed to ensure clarity and success, so you can enjoy the fruits of your labor.
Preparing the Pineapple
1. Selecting the Pineapple: Start by choosing a ripe pineapple, as mentioned earlier, to ensure maximum sweetness and flavor.
2. Peeling and Cutting: To prepare the pineapple, place it upright on a cutting board. Using a sharp knife, carefully slice off the crown and the base. Stand the pineapple upright and slice down the sides to remove the outer skin, making sure to cut away any “eyes” (the brown spots). Once peeled, cut the fruit into quarters, removing the core from each piece. Finally, chop the pineapple into small chunks for easy blending.
Blending the Mixture
1. Combining the Ingredients: In a high-speed blender, combine the chopped pineapple, ripe bananas, coconut yogurt, honey or maple syrup, vanilla extract, and a pinch of sea salt.
2. Achieving the Right Consistency: Blend on high speed until the mixture is completely smooth and creamy. If needed, stop the blender and scrape down the sides to ensure all ingredients are well incorporated. For a thinner consistency, you can add a splash of coconut water or regular water, but be cautious not to dilute the flavor.
3. Tasting and Adjusting: Once blended, taste the mixture and adjust the sweetness or flavor as needed. Add more honey or maple syrup if you prefer a sweeter popsicle or more vanilla extract for a deeper flavor.
With the mixture prepared, you are one step closer to enjoying your Tropical Bliss Pops!
In the next part of this article, we will cover how to pour the mixture into molds, the freezing process, and tips for successfully removing the pops from the molds. Get ready to treat yourself and your loved ones to a refreshing, tropical delight!
{{image_2}}
Taste Testing: Adjusting Sweetness to Your Preference
One of the most delightful aspects of making your own Tropical Bliss Pops is the ability to customize the sweetness to suit your personal taste. While the recipe provides a base level of sweetness from the fruits and any added sweeteners, it’s essential to taste the mixture before pouring it into the molds. Depending on the ripeness of your fruits, you might find that they are naturally sweet or require a little extra boost. If you prefer a more indulgent treat, consider adding a bit of honey, agave syrup, or maple syrup to enhance the flavor. For those who lean towards a healthier option, a touch of stevia or monk fruit sweetener can be a great alternative. Always remember to blend, taste, and adjust to create a popsicle that is just right for you and your family.
Filling the Molds: Best Practices for Pouring and Adding Toppings
Once you’ve achieved your desired sweetness, the next step is filling the molds with your tropical mixture. Use a funnel or a measuring cup with a spout to make this process easier and cleaner. Pour the mixture slowly to avoid bubbles, which can disrupt the pops’ texture. If you want to get creative, consider layering different fruit purees or adding chunks of fruit into the molds. This not only adds texture but also visual appeal. For added flavor and crunch, sprinkle toppings like shredded coconut, granola, or crushed nuts between layers before filling the molds completely. Make sure to leave a little space at the top of each mold to allow for expansion during freezing.
Inserting Sticks: Ensuring Stability and Avoiding Spills
To ensure that your pops are easy to handle once frozen, inserting the sticks properly is crucial. After filling the molds, let them sit for about 5-10 minutes at room temperature to allow the mixture to settle. This will help prevent the sticks from floating. Then, gently insert the sticks into the center of each mold, making sure they are stable and centered. If your molds come with lids that hold the sticks in place, use them for added security. If not, you can also cover the top of the molds with aluminum foil, poking the sticks through the foil to keep them upright during freezing. This will minimize spills and ensure that your pops come out looking perfect.
Freezing Process: Recommended Duration for Optimal Texture
The freezing process is where the magic happens. For the Tropical Bliss Pops to reach the ideal texture, they typically need to freeze for at least 4-6 hours. For best results, consider leaving them overnight. This extended freezing time allows the flavors to meld beautifully and ensures that the pops are solid enough to be removed from the molds without any issues. If you’re in a hurry and need them ready sooner, you might be able to get away with just 3 hours, but be aware that they may be a bit softer and more prone to melting. After the recommended freezing time, you can test one by gently tugging on the stick; if it comes out easily, your pops are ready to enjoy!
Unmolding Techniques: Tips for Easy Release from Molds
Getting your Tropical Bliss Pops out of the molds can sometimes be tricky, but with the right techniques, it can be a breeze. Start by running warm water over the outside of the molds for a few seconds, being careful not to let any water seep into the pops. This helps to slightly melt the outer layer of the pops, making them easier to release. Alternatively, you can gently twist the mold to loosen the pops. If you’re using silicone molds, you’ll find that they are particularly forgiving and easy to manipulate. If your pops are still stuck, give them a few more minutes at room temperature before trying again. Once released, place them on a parchment-lined tray or serve them immediately!
Nutritional Information
Each Tropical Bliss Pop is not only a delicious treat but also a nutritious one! A typical popsicle made from this recipe contains approximately 60-80 calories, depending on the specific fruits and sweeteners used. They are low in fat and provide a good source of vitamins A and C, thanks to the tropical fruits. Pineapple offers bromelain, which aids digestion, while bananas bring potassium and fiber to the mix. Additionally, if you’re using yogurt, you’ll benefit from calcium and protein, making these pops a satisfying snack that can support overall health.
Creative Variations to Tropical Bliss Pops
While the classic Tropical Bliss Pops are fantastic on their own, there are several creative variations you can try to keep things exciting. For instance, swap out the pineapple for mango or papaya for a different flavor profile. You can also experiment with different types of yogurt, such as coconut yogurt for a dairy-free option, or Greek yogurt for added protein. For seasonal variations, consider adding pumpkin puree and spices in the fall or berry blends during summer. Additionally, pairing your pops with a refreshing tropical smoothie or a vibrant fruit salad can elevate your dessert experience, making it even more satisfying.
Serving Suggestions and Presentation
When it comes to serving your Tropical Bliss Pops, presentation is key to impressing your guests. For gatherings or parties, consider arranging the pops in a decorative bucket filled with ice, making them accessible for everyone to enjoy. You can also create a popsicle platter with a variety of flavors, showcasing the colorful layers and toppings. For a touch of elegance, drizzle melted dark chocolate over the pops before serving and sprinkle with sea salt or crushed nuts. Garnishing with fresh mint leaves or edible flowers can also add a beautiful touch to your summertime desserts.
Conclusion
Making and enjoying Tropical Bliss Pops is more than just a way to cool down during hot summer days—it’s an opportunity to unleash your creativity in the kitchen while savoring the health benefits of fresh fruits. These pops are not only visually appealing but also a refreshing treat that can be enjoyed by the whole family. I encourage you to experiment with different flavors and textures, and to share your delicious creations with friends and loved ones. The satisfaction of crafting your own homemade popsicles, combined with their wholesome ingredients, makes them a delightful addition to any dessert repertoire. So gather your favorite fruits, get creative with your flavor combinations, and enjoy the fun of making these tropical delights!
