
Crispy Garlic Bread Crust Chips Recipe
Introduction
Crispy Garlic Bread Crust Chips are a delightful way to transform leftover bread crusts into a flavorful snack that’s both crunchy and satisfying. This innovative recipe not only highlights the versatility of bread but also champions the art of minimizing food waste, making it a perfect choice for the environmentally conscious home cook. With a delectable combination of garlic and herbs, these chips bring a unique twist to traditional snacking. Whether enjoyed as a standalone treat, paired with dips, or used as a topping for soups and salads, these chips are sure to impress with their robust flavors and satisfying crunch.
Understanding the Appeal of Garlic Bread Crust Chips
In recent years, there has been a significant shift in the culinary world towards utilizing every part of an ingredient, particularly in home kitchens. This trend aligns perfectly with the creation of Garlic Bread Crust Chips, which effectively gives a second life to the often-discarded bread crusts. Rather than tossing them in the trash, turning them into crispy chips elevates the crusts to new culinary heights.
Not only do these chips make for an excellent snack, but they also serve as a versatile ingredient that can enhance a wide variety of dishes. From adding texture to salads to providing a crunchy accompaniment to soups, the possibilities are endless. The combination of fresh garlic and Italian herbs creates a flavor profile that is both aromatic and satisfying, making these chips a must-try for anyone who enjoys bold flavors.
Moreover, the process of transforming leftover bread into something delicious reflects a growing movement in modern cooking towards creativity and sustainability. By embracing the use of leftovers, home cooks can reduce waste while also experimenting with new flavors and textures, making each meal a little more exciting.
Ingredients Breakdown
To create the perfect batch of Crispy Garlic Bread Crust Chips, it’s essential to gather the right ingredients. Here’s a detailed breakdown of what you’ll need:
– Leftover Bread Crusts: The star of this recipe, bread crusts can vary in type and texture. Whether you’re using the crusts from a loaf of sourdough, whole wheat, or a classic French baguette, each type brings its own unique flavor and crunch. The key is to use crusts that are firm enough to withstand the baking process, ensuring they become crispy without burning.
– Unsalted Butter: This ingredient plays a crucial role in both flavor and texture. Unsalted butter allows you to control the seasoning of your chips and adds a rich, buttery taste that complements the garlic beautifully. Melting the butter before applying it to the crusts ensures an even coating, resulting in perfectly crisp chips.
– Fresh Garlic: The heart of the flavor in these chips, fresh garlic provides a pungent aroma and a robust taste that elevates the overall experience. Not only does garlic enhance the flavor profile, but it also offers numerous health benefits, including immune support and cardiovascular health.
– Italian Herbs: A blend of dried Italian herbs, such as oregano, basil, and thyme, adds depth and complexity to the garlic flavor. These herbs not only enhance the taste of the chips but also infuse them with a fragrant aroma that is sure to entice anyone nearby.
– Optional Ingredients: For those looking to add a little extra kick, consider incorporating red pepper flakes for heat or freshly grated Parmesan cheese for a rich, cheesy finish. These optional ingredients can take your garlic bread chips to the next level, allowing for customization based on personal preferences.
– Nutritional Insights: While these chips are primarily a snack, they can still offer nutritional benefits. Whole grain bread crusts provide fiber, while garlic boasts various health benefits. However, it’s essential to enjoy these chips in moderation, as the addition of butter and cheese can increase calorie content.
Preparation Steps in Detail
Now that you have your ingredients ready, it’s time to dive into the preparation process. The first step is crucial for ensuring that your Garlic Bread Crust Chips turn out perfectly crispy:
1. Preheating the Oven: Preheat your oven to 375°F (190°C). This temperature is optimal for baking the chips, allowing them to crisp up without burning. Preheating is an essential step in baking, as it ensures that your food cooks evenly and achieves the desired texture. An adequately heated oven will provide the necessary environment for the moisture in the bread crusts to evaporate, resulting in a dry, crunchy chip.
By following these initial steps and understanding the significance of each ingredient, you’re well on your way to crafting an irresistible snack that embraces sustainability and flavor. Stay tuned for the next steps in this delicious Garlic Bread Crust Chips recipe!
{{image_2}}
Preparing Bread Crusts
When it comes to making crispy garlic bread crust chips, the type of bread crust you use can significantly impact the final product. Here are techniques for handling both stale and fresh crusts to achieve that perfect crunch.
Stale Bread Crusts
Stale bread crusts are ideal for this recipe because they possess a drier texture, which translates to a crispier chip after baking. If you have leftover baguettes or sourdough loaves, simply cut them into 1-inch pieces or strips. Before proceeding, consider letting them sit out for a few hours, or even overnight, to ensure they are completely dry. If you need to expedite the process, you can toast the crusts in a low oven (about 200°F) for 10-15 minutes, turning them halfway through. This will remove excess moisture without browning them too much.
Fresh Bread Crusts
Fresh bread can also work in a pinch, although it may require a slightly different approach. To prepare fresh crusts, you can cut the bread into the desired shapes and allow them to dry out for about an hour before seasoning. Alternatively, you can slice them thinner (about 1/2 inch) to help them crisp up faster during baking. If using fresh bread, keep a close eye on them while baking, as they may brown quicker than stale crusts.
Making the Garlic Butter
The flavor of your garlic bread crust chips largely depends on the garlic butter mixture. Here’s a breakdown of each ingredient and its role:
– Unsalted Butter: This is the base of your garlic butter and provides richness. Using unsalted butter allows you to control the saltiness of your chips.
– Fresh Garlic: The star of the show! Freshly minced garlic infuses the butter with a robust flavor. You can adjust the quantity to your liking, but typically 2-4 cloves work well.
– Parsley: Adding fresh or dried parsley not only enhances flavor but also gives a pop of color to your chips. It complements the garlic beautifully.
– Salt: A pinch of salt will help to elevate the flavors. Remember, you can always add more, but you can’t take it away.
– Optional Add-ins: Consider adding a sprinkle of red pepper flakes for heat, or grated Parmesan cheese for a cheesy twist.
To make the garlic butter, simply melt the butter in a small saucepan over low heat. Once melted, remove from heat and stir in the minced garlic and any additional ingredients. Let the mixture sit for a few minutes to allow the flavors to meld before using it to coat the bread crusts.
Coating the Bread Crusts
Ensuring even distribution of the garlic butter is crucial for optimal flavor. Here’s how to coat your bread crusts properly:
1. Combine the Crusts and Garlic Butter: Place your prepared bread crusts in a large mixing bowl. Pour the melted garlic butter over the crusts.
2. Toss Gently: Using your hands or a spatula, toss the bread crusts gently until they are fully coated. Be careful not to break them apart; you want them to maintain their shape.
3. Check for Coverage: After tossing, take a moment to inspect the crusts. They should have a glossy appearance without pooling butter at the bottom of the bowl. If they seem dry, add a little more melted butter until you achieve an even coating.
Arranging on the Baking Sheet
The way you arrange the bread crusts on the baking sheet significantly affects their crispness. Here’s how to do it right:
1. Use Parchment Paper: Line your baking sheet with parchment paper for easy cleanup and to prevent sticking.
2. Spacing is Key: Spread the coated bread crusts in a single layer on the baking sheet, ensuring they are not touching. This allows for proper airflow and even baking, which is essential for achieving that ideal crispy texture.
3. Batch Baking: If you have too many crusts for one baking sheet, bake them in batches rather than overcrowding the pan. This will ensure that every chip gets the heat it needs to crisp up.
Baking Process
The baking process is where the magic happens. Here’s what to look for to achieve the perfect texture:
1. Preheat the Oven: Preheat your oven to 375°F (190°C). A properly heated oven ensures even cooking.
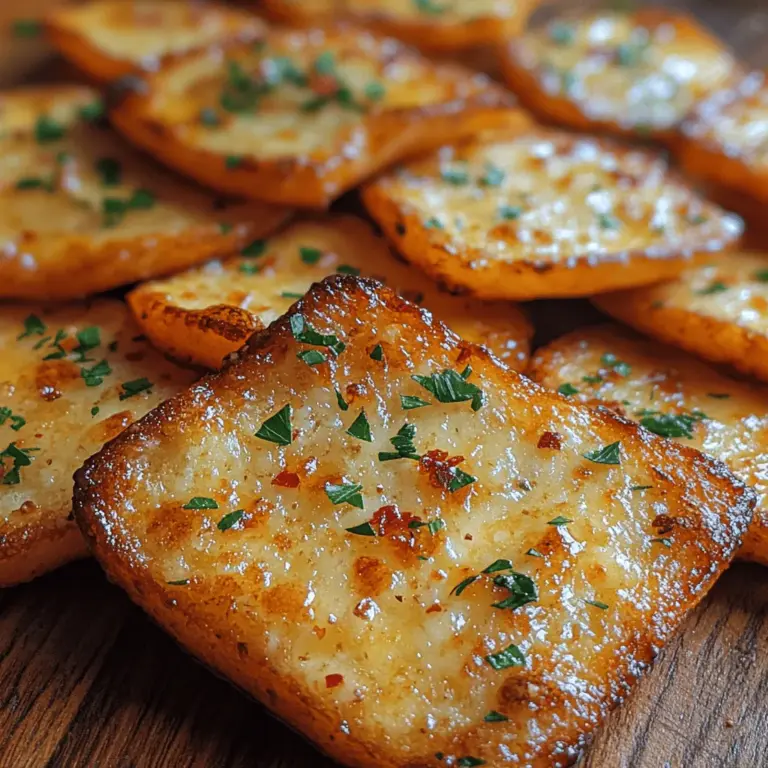
2. Watch Closely: Bake the bread crusts for about 10-15 minutes, or until they are golden brown and crispy. Halfway through, stir or flip the crusts to promote even browning.
3. Cool for Crispness: Once baked, remove the sheet from the oven and allow the chips to cool on the baking sheet for a few minutes. This cooling period allows them to firm up even more, enhancing their crunchiness.
Serving Suggestions
Crispy garlic bread crust chips are incredibly versatile and can be enjoyed in several creative ways. Here are some suggestions for serving them:
As a Snack on Their Own
Simply enjoy the chips as a standalone snack. Their bold garlic flavor and satisfying crunch make them irresistible on their own. Serve with a sprinkle of extra sea salt or fresh herbs for added flavor.
Pairing with Soups, Salads, or Dips
These chips are an excellent accompaniment to a variety of dishes. Serve them alongside soups like tomato basil, creamy potato, or a hearty minestrone for a delightful textural contrast. They also pair well with fresh salads, adding a crunchy element to greens.
If you’re in the mood for dips, consider classic options like hummus, tzatziki, or guacamole. The garlic flavor in the chips enhances the richness of these dips, creating a harmonious blend of flavors.
Presentation Tips for Serving
When it comes to serving, presentation can elevate the dining experience:
– Rustic Bowl or Wooden Board: Serve the chips in a rustic bowl or on a wooden board for a charming, homemade touch. This not only looks visually appealing but also invites guests to help themselves.
– Complementary Sauces: Consider drizzling a small bowl of marinara sauce or garlic aioli alongside the chips for dipping. This adds another layer of flavor and enhances the overall presentation.
The Versatility of Garlic Bread Crust Chips
Crispy garlic bread crust chips are not just a one-dimensional snack; they can be utilized in various culinary contexts:
Incorporating Into Meals or as Toppings
– Salad Toppers: Crush the chips and sprinkle them over salads for a crunchy topping that adds flavor.
– Casserole Crunch: Use the chips as a topping for casseroles or baked dishes. Their crispiness provides an excellent contrast to the tender textures of baked ingredients.
Meal Prepping Staple
Garlic bread crust chips can easily become a staple in your meal prep routine. Batch cook them at the beginning of the week and store them in an airtight container. This way, you’ll have a crunchy, flavorful snack on hand whenever cravings strike.
Conclusion
Making crispy garlic bread crust chips is a simple yet delicious way to transform leftover bread into a delightful snack. Not only do you get to enjoy this tasty treat, but you also contribute to reducing food waste, making them a guilt-free indulgence.
Experiment with different flavors and spice combinations, and don’t hesitate to make them your own. The beauty of this recipe lies in its versatility, inviting you to explore various culinary applications. So, gather your stale bread crusts, whip up that garlic butter, and get ready to enjoy a snack that you can feel good about!
