
Garlic breadsticks are more than just a side dish; they are a beloved staple that elevates any meal. Whether served alongside a hearty pasta dish or enjoyed as an appetizer, these crispy delights have a universal appeal. The combination of warm, soft bread infused with the rich aroma of garlic and herbs creates a sensory experience that is hard to resist. Making breadsticks at home not only allows for customization but also provides a satisfying baking experience that fills your kitchen with irresistible scents.
This recipe focuses on crafting crispy garlic breadsticks, offering a perfect texture and a harmonious blend of flavors that will leave your taste buds craving more. The satisfaction of baking from scratch, combined with the joy of sharing warm, homemade breadsticks with family and friends, makes this recipe a must-try for any home cook.
Understanding the Ingredients
Before diving into the baking process, it’s essential to understand the role of each ingredient in the crispy garlic breadsticks recipe. This knowledge will not only enhance your baking skills but also help you appreciate the nuances of the flavors and textures involved.
Key Ingredients
1. All-Purpose Flour: The backbone of the recipe, all-purpose flour provides the necessary structure for the breadsticks. It has a balanced protein content that allows for the perfect rise and chewiness. While bread flour can be used for a chewier texture, all-purpose flour is more accessible and still yields excellent results.
2. Yeast: A crucial ingredient for leavening, yeast is what transforms your dough into fluffy, airy breadsticks. Using warm water to activate the yeast is vital; it helps the yeast bloom and begin the fermentation process. The warmth encourages the yeast to produce carbon dioxide, which causes the dough to rise.
3. Olive Oil: This ingredient adds flavor and contributes to the overall texture of the breadsticks. Olive oil helps create a slightly crisp exterior while keeping the inside tender. It also enhances the flavor profile, making each bite more enjoyable.
4. Garlic: Fresh minced garlic is the star of this recipe, providing that signature aroma and taste. You can also experiment with roasted garlic for a milder, sweeter flavor or use garlic powder for convenience.
5. Herbs: Fresh herbs like parsley or oregano not only elevate the flavor of the breadsticks but also add a pop of color. While dried herbs can be used, fresh herbs will impart a brighter, more vibrant taste.
Activating the Yeast
One of the key steps in making crispy garlic breadsticks is activating the yeast. This process is straightforward but requires careful attention to temperature and timing.
Step-by-Step Yeast Activation
1. Warm Water: Start by measuring out warm water, typically between 100°F to 110°F (37°C to 43°C). This temperature range is ideal for activating the yeast without killing it. If the water is too hot, it can kill the yeast, while water that is too cold may not activate it effectively.
2. Add Yeast: Sprinkle the yeast over the surface of the warm water. Allow it to sit for about 5 to 10 minutes. During this time, the yeast will begin to bubble and foam, indicating that it is alive and ready to work its magic.
3. Check for Activation: You’ll know the yeast is activated when you see a frothy layer forming on top of the water. This is a sign that the yeast is producing carbon dioxide, which is essential for the dough’s rise.
Preparing the Dough
With the yeast activated, it’s time to move on to preparing the dough. This step involves mixing the ingredients to create a cohesive dough that will be the foundation for your breadsticks.
Mixing Ingredients
1. Create a Well: In a large mixing bowl, add the all-purpose flour and create a well in the center. This well will hold the activated yeast mixture, olive oil, and any other ingredients you wish to incorporate.
2. Incorporate Ingredients: Pour the activated yeast mixture into the well, followed by olive oil and any additional seasonings you prefer, such as salt or herbs. Use a wooden spoon or your hands to gradually incorporate the flour from the edges of the well into the liquid, forming a shaggy dough.
3. Texture Expectations: As you mix, the dough will start to come together but may still be somewhat sticky. This is normal. The goal is to create a dough that is cohesive yet slightly tacky to the touch. Avoid adding too much extra flour, as this can result in dense breadsticks.
Kneading the Dough
Kneading is a crucial step that helps develop the gluten in the dough, which contributes to the final texture of the breadsticks. Proper kneading ensures that your breadsticks will be light and airy with a satisfying bite.
Kneading Techniques
1. Knead by Hand: Transfer the dough to a lightly floured surface. Using the heel of your hand, push the dough away from you, then fold it back over itself. Rotate the dough a quarter turn and repeat this process. Knead for about 8 to 10 minutes until the dough is smooth and elastic.
2. Signs of Readiness: The dough should be soft and slightly tacky but not overly sticky. A well-kneaded dough will spring back when poked and have a smooth surface.
3. Adjusting Consistency: If the dough feels too sticky, add small amounts of flour, a tablespoon at a time, until the desired consistency is achieved. Be cautious not to over-flour, as this can lead to dry breadsticks.
First Rise: The Key to Fluffy Breadsticks
After kneading, it’s time for the first rise, which is essential for developing flavor and creating the fluffy texture we desire in our garlic breadsticks.
Importance of the First Rise
1. Dough Development: During the first rise, the yeast continues to work, producing gases that cause the dough to expand. This process not only enhances the flavor through fermentation but also creates the light and airy structure of the breadsticks.
2. Ideal Conditions: To facilitate a successful rise, place the dough in a warm, draft-free area. Cover it with a clean kitchen towel or plastic wrap to retain moisture. The ideal temperature for rising dough is around 75°F to 80°F (24°C to 27°C).
3. What to Expect: After about an hour, the dough should have doubled in size. It will feel light and airy, and when gently pressed, it should hold an indentation without collapsing. This is a sign that the yeast has done its job, and your dough is ready for the next steps in creating those delicious crispy garlic breadsticks.
With the dough prepared and risen, you’re well on your way to enjoying homemade crispy garlic breadsticks that are sure to impress. Stay tuned for the next steps where we’ll shape, season, and bake these delectable treats to perfection.
{{image_2}}
Crafting the Garlic Topping
To elevate your crispy garlic breadsticks, crafting the perfect garlic topping is essential. The key lies in a balanced combination of fresh garlic, herbs, and olive oil that not only enhances flavor but also provides that signature aroma that makes garlic bread irresistible.
How to Make the Garlic Topping
Start by finely mincing 4-6 cloves of fresh garlic. Fresh garlic is vital here, as it offers a robust flavor that garlic powder simply cannot replicate. Combine the minced garlic with 1/4 cup of extra virgin olive oil in a small bowl. This garlic oil mixture will not only be used to brush on the breadsticks before baking but will also serve as a dipping sauce after they’re cooked.
The Balance of Herbs and Spices
For a more complex flavor, consider adding a pinch of salt, a teaspoon of dried oregano, and a sprinkle of crushed red pepper flakes to your garlic oil. The dried oregano adds an earthy note, while the red pepper flakes introduce a subtle kick. Adjust these herbs according to your taste preference, but remember that too much can overpower the garlic’s natural flavor.
Importance of Using Fresh Ingredients
Using fresh ingredients, particularly fresh herbs, makes a significant difference in flavor. If you have access to fresh parsley or basil, chopping a tablespoon and adding it to the garlic oil just before using will brighten the mixture, enhancing the overall taste of your breadsticks.
Shaping the Breadsticks
Once your dough has risen and doubled in size, it’s time to shape the breadsticks. This step requires a gentle touch to maintain the airiness of the dough.
Techniques for Rolling Out the Dough Evenly
Begin by lightly flouring your work surface and your hands. Gently punch down the risen dough to release any air bubbles. Divide the dough into equal portions, depending on how thick you want your breadsticks. For standard-sized breadsticks, aim for about 12 portions.
Using your hands, roll each piece of dough into a rope-like shape, about 1/2 inch thick. Try to keep the thickness as uniform as possible to ensure even baking. If you find the dough is springing back, allow it to rest for a few minutes, which will help relax the gluten and make rolling easier.
Tips for Cutting Uniform Breadsticks
Once you have your dough rolled out, transfer the ropes to a baking sheet lined with parchment paper. Depending on your preference, you can cut them to your desired length, usually around 6-8 inches. Use a sharp knife or a pizza cutter for clean cuts.
Visual Cues for Proper Thickness and Size
The ideal thickness should be about 1/2 inch. If you want a softer breadstick, roll them slightly thicker. For a crunchier texture, aim for thinner sticks. A good visual cue is to ensure that they are not too short or too long; they should be easy to grab and dip!
Second Rise: Preparing for Baking
The second rise is crucial for achieving light, airy breadsticks. This process allows the dough to relax and rise again, making them fluffier.
Explanation of the Second Rise
After shaping the breadsticks, cover them with a clean kitchen towel and let them rise again in a warm place for about 30-45 minutes, or until they puff up slightly. This second rise enhances the texture of your breadsticks, making them light rather than dense.
Importance of Spacing the Breadsticks
When placing the breadsticks on the baking sheet, ensure there is enough space between each stick. This spacing allows for even heat distribution during baking and prevents them from sticking together. A good rule of thumb is to leave at least 1-2 inches between each breadstick.
Final Touches: Brushing with Garlic Oil
Before baking, brush each breadstick generously with your prepared garlic oil mixture. This step not only infuses flavor but also helps in achieving that golden brown color during baking. Reserve some garlic oil for serving later, as it makes a delicious dipping sauce.
Baking to Perfection
Baking your garlic breadsticks at the right temperature and for the correct amount of time is essential for achieving that perfect crispy exterior while keeping the inside soft.
Ideal Oven Temperature and Baking Time
Preheat your oven to 425°F (220°C). A hot oven is crucial for creating that crispy crust. Bake the breadsticks for about 12-15 minutes, or until they are lightly golden and crispy.
Visual Indicators of Doneness
Keep an eye on your breadsticks as they bake. They should turn a beautiful golden-brown color, and if you tap on the bottom, it should sound hollow. This sound indicates that they are cooked through and have developed a nice crust.
Tips for Achieving the Perfect Golden-Brown Finish
For an extra crispy finish, you can turn on the broiler for the last 1-2 minutes of baking. Just be sure to watch them closely, as they can go from perfectly golden to burnt very quickly.
Serving Suggestions
These crispy garlic breadsticks are versatile and can be served in various ways to complement your meal or stand alone as a delightful snack.
Ideas for Serving the Breadsticks
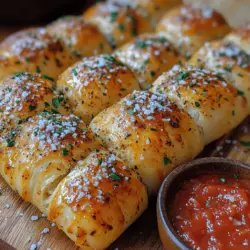
Serve your garlic breadsticks warm, paired with a side of marinara sauce for dipping. The rich tomato flavor contrasts beautifully with the garlicky bread. Alternatively, a simple garlic butter dip made from melted butter mixed with minced garlic and parsley can also elevate the experience.
Pairing Suggestions with Main Dishes or as Appetizers
These breadsticks make an excellent side for Italian dishes such as pasta, lasagna, or a fresh salad. They can also be enjoyed as an appetizer before a hearty meal, perfect for sharing among friends and family.
Presentation Tips for Attractive Serving
For a visually appealing presentation, arrange the breadsticks in a tall, rustic basket lined with a cloth napkin. Drizzle a little of the reserved garlic oil over the top for an added touch and serve with small bowls of dipping sauces.
Nutritional Information
Understanding the nutritional value of your homemade garlic breadsticks can help you appreciate them even more.
Basic Nutritional Breakdown
Each breadstick contains approximately 150 calories, with 4 grams of protein, 5 grams of fat, and 24 grams of carbohydrates. The nutritional content may vary based on the size of the breadsticks and the exact ingredients used.
Discussion on Potential Variations
For those seeking alternatives, consider using whole wheat flour for a healthier option. You can also substitute olive oil with vegan butter if you’re looking for a completely vegan recipe. Experiment with different herbs, such as rosemary or thyme, to find your favorite flavor combinations.
Conclusion
Homemade crispy garlic breadsticks bring warmth and comfort to any meal, and the joy of baking them from scratch is unmatched. The process allows you to infuse flavors that store-bought versions simply cannot replicate.
Don’t hesitate to experiment with different herbs, spices, or even cheeses in your garlic oil to create unique flavors. Whether served with a meal or enjoyed as a snack, these breadsticks are sure to become a favorite in your kitchen. Embrace the baking process, savor the aromas, and enjoy the satisfaction that comes with creating your delicious crispy garlic breadsticks.