
Introduction
In the world of snacks, few things are as satisfying as a bowl of crispy tortilla chips. Their delightful crunch, paired with the ability to complement a variety of dips, makes them a quintessential staple for parties, game days, and casual gatherings alike. Whether served with guacamole, salsa, or a rich queso, tortilla chips offer a versatile canvas for flavors, making them a favorite among snack enthusiasts.
In this article, we will guide you through the process of creating Zesty Crunchy Chili Lime Tortilla Chips, a tantalizing twist on the classic snack that is not only easy to make but also bursting with vibrant flavors. Imagine the zesty brightness of fresh lime paired with the warming heat of chili, all enveloped in a satisfyingly crispy chip. This recipe will elevate your snacking experience, transforming ordinary moments into extraordinary taste adventures.
Understanding the Flavor Profile of Zesty Crunchy Chili Lime Tortilla Chips
To appreciate the Zesty Crunchy Chili Lime Tortilla Chips fully, it’s important to delve into the flavor profile that makes them so irresistible.
The combination of lime and chili creates a dynamic interplay of flavors that excites the palate. Lime adds a refreshing acidity that brightens the dish, cutting through the richness of dips and enhancing the overall experience. On the other hand, chili introduces a depth of warmth, offering a subtle kick that complements the zesty lime without overpowering it. This balance of flavors is what sets these tortilla chips apart from the rest.
Seasoning plays a crucial role in transforming simple ingredients into a culinary delight. The right blend of spices can amplify the taste of the chips, ensuring that each bite is packed with flavor. In our recipe, we incorporate a selection of spices, including chili powder, garlic powder, and onion powder, that work in harmony to create an irresistible snacking experience.
Selecting the Right Ingredients
Creating the perfect Zesty Crunchy Chili Lime Tortilla Chips begins with selecting the right ingredients. The foundation of any great tortilla chip is quality corn tortillas. Opting for fresh, high-quality tortillas ensures that your chips have the ideal texture and flavor. Look for tortillas made with whole corn kernels for a more robust taste and a satisfying crunch.
Fresh lime juice and zest are also essential components of this recipe. The zest captures the aromatic oils from the lime peel, while the juice delivers bright acidity. Using fresh lime instead of bottled juice results in a vibrant flavor that elevates your chips to the next level.
Understanding the role of spices is also crucial. Chili powder provides the necessary heat, while garlic powder and onion powder add depth of flavor. A sprinkle of sea salt enhances all these elements, rounding out the taste profile.
Finally, when it comes to frying, the choice of oil matters. Vegetable oil is ideal for frying tortilla chips due to its high smoke point, which allows for optimal frying without imparting any unwanted flavors. This ensures that your chips remain light and crispy while absorbing just the right amount of oil.
Preparation Steps for Perfect Tortilla Chips
Now that we have an understanding of the key ingredients, it’s time to dive into the preparation steps that will lead to perfectly crunchy tortilla chips.
Preparing the Tortillas for Frying
The first step in creating your Zesty Crunchy Chili Lime Tortilla Chips is to prepare the tortillas for frying. Start by stacking your corn tortillas and cutting them into uniform triangles. A sharp knife or pizza cutter works well for this task, ensuring clean cuts that yield evenly sized chips. Consistency in size is key, as it ensures that the chips cook evenly and at the same rate.
For optimal crunch, consider cutting the tortillas into smaller triangles, about 2 to 3 inches each, as they will fry up crispier and be easier to handle for dipping. If you prefer a thicker chip, you can cut larger triangles, but be mindful that they may require a longer frying time to achieve the desired crispness.
Heating the Oil for Frying
With your tortillas cut and ready, the next step is to heat the oil for frying. The temperature of the oil is critical for achieving that perfect crunch. Aim for a frying temperature of around 350°F (175°C). At this temperature, the chips will sizzle upon contact with the oil, creating a crispy exterior while keeping the interior light and airy.
To check if your oil is hot enough, you can drop a small piece of tortilla into the oil; if it bubbles vigorously, the oil is ready for frying. Avoid overcrowding the frying pan, as this can lower the oil temperature and result in soggy chips. Fry your tortilla triangles in small batches, allowing them to cook for about 2 to 3 minutes, or until they turn golden brown.
As you fry, keep a close eye on the chips, turning them occasionally to ensure they cook evenly. Once they reach that perfect golden hue, remove them from the oil and place them on a paper towel-lined plate to drain any excess oil.
This initial preparation sets the stage for the final seasoning and zesty transformation of your tortilla chips. Get ready to take your snacking to the next level with the addition of the chili-lime seasoning that will be discussed in the next section.
{{image_2}}
Safety Tips When Frying at Home
Frying at home can be a delightful yet potentially hazardous activity if not approached with caution. Here are some essential safety tips to ensure a safe frying experience:
1. Use the Right Equipment: Always use a heavy-bottomed pot or a deep fryer for frying. These types of cookware help maintain a consistent temperature and reduce the risk of oil splattering.
2. Monitor the Oil Temperature: Use a thermometer to check the oil temperature, ideally between 350°F and 375°F for frying tortilla chips. If the oil is too hot, it can ignite; if it’s too cold, the chips will absorb too much oil and become greasy.
3. Avoid Water Contact: Ensure that your tortilla chips are completely dry before frying. Water can cause the hot oil to splatter, leading to burns.
4. Keep a Safe Distance: When frying, maintain a safe distance from the pot to avoid splashes. It’s also wise to use a splatter guard if you have one.
5. Have a Fire Extinguisher Handy: In case of fires, ensure that a fire extinguisher rated for grease fires is easily accessible in your kitchen.
Frying the Chips to a Perfect Golden Brown
Once you have your safety measures in place, it’s time to fry the chips. Following these steps will help you achieve that perfect golden-brown color:
1. Heat the Oil: Pour enough oil into your pot to submerge the chips, approximately 2-3 inches deep. Heat the oil over medium-high heat until it reaches the desired temperature of 350°F to 375°F.
2. Fry in Batches: Carefully drop a handful of tortilla chips into the hot oil, ensuring not to overcrowd the pot. Frying in batches allows the chips to cook evenly and prevents the temperature of the oil from dropping too much.
3. Watch for Color Change: As the chips fry, keep a close eye on their color. In about 2-3 minutes, the chips should start to turn golden brown. Use a slotted spoon to gently stir them, ensuring that all sides are frying evenly.
4. Remove and Drain: Once the chips are golden brown and crispy, carefully remove them from the oil using a slotted spoon. Allow excess oil to drain off before transferring them to a plate lined with paper towels.
Tips for Avoiding Overcrowding in the Pan
Overcrowding the frying pan can lead to uneven cooking and soggy chips. Here are some practical tips to avoid this common issue:
– Work in Small Batches: Fry no more than a handful of chips at a time. This will allow the oil to circulate around each chip, ensuring they fry evenly and achieve maximum crispiness.
– Use a Timer: Set a timer for each batch to keep track of frying times. This will help you manage your cooking without becoming distracted.
– Keep Chips Warm: If you’re frying multiple batches, keep the finished chips warm in an oven set to a low temperature (around 200°F). This keeps them crispy while you finish frying the rest.
Signs to Look for When the Chips Are Ready to Be Removed
Knowing when your chips are perfectly fried is crucial for achieving that delightful crunch. Here are some signs to watch for:
– Golden Brown Color: The chips should be a rich golden brown. If they appear pale, they likely need more time to fry.
– Crispy Texture: Test a chip from the batch; it should feel crisp when you bite into it. If it feels soft or chewy, it may need additional frying.
– Bubbling Oil Calms: As chips become fully cooked, the bubbling in the oil will start to subside. This is a good indicator that they are nearing completion.
Seasoning the Chips for Maximum Flavor
Once the chips are fried to perfection, it’s time to elevate their flavor profile with a zesty seasoning. Here’s how:
The Timing of Seasoning: Why Warm Chips Absorb Flavor Better
The best time to season your chips is immediately after frying while they are still warm. Warm chips absorb flavors more effectively, allowing the seasoning to penetrate and enhance the overall taste.
Creating the Zesty Mixture: Balancing Lime Zest, Juice, and Spices
To create your zesty seasoning mixture, follow these steps:
1. Ingredients for Zesty Mixture:
– 1 teaspoon lime zest
– 2 tablespoons fresh lime juice
– 1 teaspoon chili powder
– ½ teaspoon garlic powder
– ½ teaspoon salt
– Optional: A pinch of cayenne pepper for added heat
2. Mixing the Seasoning: In a small bowl, combine the lime zest, lime juice, chili powder, garlic powder, salt, and any additional spices. Mix well to form a cohesive seasoning blend.
Techniques for Tossing Chips to Ensure Even Coating
To ensure that every chip is evenly coated with the zesty mixture, follow these techniques:
– Use a Large Bowl: Transfer the warm chips to a large mixing bowl. This allows for more space to toss the chips without breaking them.
– Drizzle the Mixture: Drizzle the zesty seasoning mixture over the chips, ensuring an even distribution.
– Gently Toss: Use a spatula or your hands to gently toss the chips. Make sure to lift from the bottom and turn the chips over rather than stirring vigorously, which can break them.
Serving Suggestions and Pairings
Presenting your Zesty Crunchy Chili Lime Tortilla Chips beautifully can enhance the dining experience. Here are some creative serving suggestions:
Arranging the Chips for Visual Appeal
– Serve in a Cone: For a fun and casual presentation, place the chips in a paper cone or a small basket lined with parchment paper. This adds a festive touch perfect for parties.
– Layered Platter: Arrange the chips in a circular pattern on a large serving platter, allowing for good visibility of the chips’ vibrant colors.
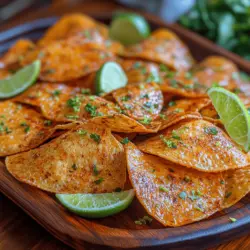
Garnishing with Cilantro and Lime: Importance of Presentation
To elevate your snack visually, consider garnishing the chips:
– Fresh Cilantro: Sprinkle chopped fresh cilantro over the chips for a burst of color and flavor.
– Lime Wedges: Add lime wedges on the side for an added touch and allow guests to squeeze fresh lime juice over their chips if they desire.
Suggested Dips: Salsa, Guacamole, and More
Pairing your chips with the right dips can elevate your snack experience:
– Classic Salsa: A fresh tomato salsa balances the zesty chips perfectly. The acidity from the tomatoes complements the lime flavor.
– Creamy Guacamole: The richness of guacamole pairs beautifully with the crunchy texture of the chips, creating a satisfying contrast.
– Spicy Cheese Dip: For those who enjoy a little indulgence, a warm cheese dip spiced with jalapeños can take your flavor experience to the next level.
Nutritional Benefits of Zesty Crunchy Chili Lime Tortilla Chips
Homemade snacks often have more nutritional benefits than their store-bought counterparts. Here’s a closer look at the nutritional content of some key ingredients:
Analyzing the Nutritional Content of Key Ingredients
– Tortilla Chips: Made from corn, tortilla chips provide essential carbohydrates and fiber. When baked instead of fried, they can offer a healthier option.
– Lime: Rich in vitamin C, limes contribute antioxidants that can help boost your immune system and improve skin health.
– Spices: Ingredients like chili powder and garlic powder not only add flavor but also come with their own health benefits, such as anti-inflammatory properties.
The Benefits of Homemade Snacks Over Store-Bought Alternatives
Homemade tortilla chips allow for full control over the ingredients, enabling you to avoid preservatives and unhealthy additives. Additionally, making them at home can accommodate dietary preferences, such as gluten-free options.
How to Enjoy These Chips in Moderation as Part of a Balanced Diet
While these chips are delicious, it’s essential to enjoy them as part of a balanced diet. Here are some tips:
– Portion Control: Serve them in small bowls to help manage portion sizes.
– Pair with Healthy Dips: Opt for dips rich in nutrients, such as guacamole or salsa, to enhance the overall nutritional value of your snack.
Conclusion
Creating Zesty Crunchy Chili Lime Tortilla Chips is a rewarding culinary experience that brings together simple ingredients and bold flavors. This recipe not only satisfies cravings but also provides an opportunity to engage with the process of cooking. Whether for a gathering or a quiet night in, these chips are sure to impress with their zesty kick and delightful crunch. Enjoy the satisfaction of making your own snacks and the pleasure they bring to your dining table. So, gather your ingredients, follow the steps, and indulge in the savory taste of homemade tortilla chips that are bursting with flavor.